

Most retail traders lose money not because they lack discipline but because they’re reading charts the wrong way.
If you’ve ever been stopped out right before the market moved in your direction, you’ve already felt the impact of institutional order flow. That’s exactly what the order block trading strategy is designed to expose.
In this guide, you’ll learn what order blocks are, how to identify them with precision, and how to build a rules-based framework around them. By the end, you’ll know exactly how professional money moves and how to trade with it, not against it.
What Is an Order Block in Forex Trading?
An Order block is the last opposing candle before a strong impulsive price move.
Think of it this way: banks and institutions can’t fill a $500 million position in one trade. They break it up. They place initial orders, push price, and then let it return to their original entry zone to fill the rest. That zone, the origin of the move, is the order block.
Two types of order blocks matter most:
- Bullish order block: the last bearish (red) candle before a strong upward impulse. Price often returns here before continuing higher.

- Bearish order block: the last bullish (green) candle before a strong downward impulse. Price often returns here before dropping further.

How to trade order blocks:
Bullish Scenario:

Bearish Scenario:

How to Identify a Valid Order Block — Step by Step
This is where most traders get it wrong. Not every consolidation zone is an order block.
Here’s the three-step filter used in smart money concept (SMC) analysis:
Step 1: Find the Origin Candle
Look for the last bullish or bearish candle directly before a strong, impulsive move. The move must be decisive several candles in one direction with minimal pullback.
Step 2: Confirm Displacement
Displacement means the candle that breaks away from the order block zone is large-bodied with small wicks. This signals genuine institutional intent, not retail noise.
If the breakout candle is weak or choppy, the order block is probably not institutional. Skip it.
Step 3: Draw the Zone Correctly
Mark the zone from the open to the close of the origin candle, not the wick-to-wick range. The body is where the orders actually live. Wicks represent noise.
Quick validity checklist:
- Has price already returned to this zone and bounced? If yes, the OB is mitigated; it’s spent.
- Is the origin candle clearly isolated before the impulse? If not, you may be marking the wrong candle.
- Does the zone sit at a strong level of HTF structure, liquidity pool, or fair value gap? If yes, the probability goes up.
The Order Block Trading Strategy — Entry, Stop, and Target Framework
Here’s how to build a complete trade around an order block.
Top-down analysis first. Always start on the higher timeframe (H4 or daily) to determine bias. If the 4H trend is bullish, you’re only looking for bullish order blocks on H1 and below.
Entry rules:
- Wait for the price to return to the OB zone; never chase.
- Look for a confirmation trigger: a rejection candle (engulfing or pin bar), a fair value gap fill, or a market structure shift (MSS) on the lower timeframe entry chart.
- Enter at the 50% level of the OB or at the top of the zone for a bullish OB (reverse for bearish).
Stop-loss placement:
- Place stops just below the wick of the origin candle for bullish OBs.
- This protects you from a full zone wipeout while allowing normal price fluctuation.
Take-profit targets:
- First target: the nearest opposing liquidity pool (previous high or low).
- Full target: the next significant order block or supply/demand zone in the direction of the trade.
- Minimum risk-to-reward ratio: 1:2. Many clean OB setups offer 1:3 or better.
The breaker block when OBs flip:
When a bullish order block is fully violated (price breaks below it with momentum), it becomes a breaker block — now acting as resistance on the retest. This is one of the most reliable reversal signals in institutional order flow analysis.
Common Mistakes I See Traders Make With Order Blocks
After reviewing [INSERT NUMBER] trades and working with [INSERT NUMBER] students, the same errors appear over and over.
Mistake 1: Trading mitigated order blocks
Once price returns to an OB and bounces, the zone is used up. Stop marking it. Stop trading it. Move on.
Mistake 2: Ignoring the higher timeframe bias
A beautiful H1 bullish order block means nothing if the D1 trend is bearish. You’re fighting institutional order flow, not trading with it. Always align your entry timeframe with the higher-timeframe direction.
Mistake 3: Entering without confirmation
Price touching an order block is not an entry signal. It’s an alert to pay attention. Wait for a structure shift or a rejection candle before pulling the trigger.
Mistake 4: Oversizing on ‘perfect’ setups
No setup is guaranteed. Adjust your risk per trade according to your trading plan regardless of how clean the OB looks. The market owes you nothing.
Mistake 5: Marking too many zones
If your chart looks like a zebra, you’re marking too many OBs. Quality over quantity. Three clean, high-confluence zones beat twenty mediocre ones every time.
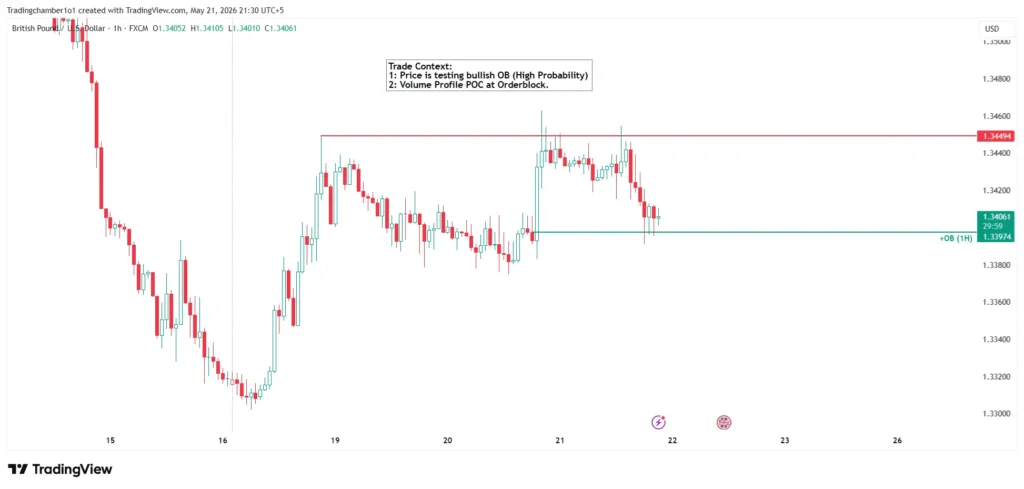
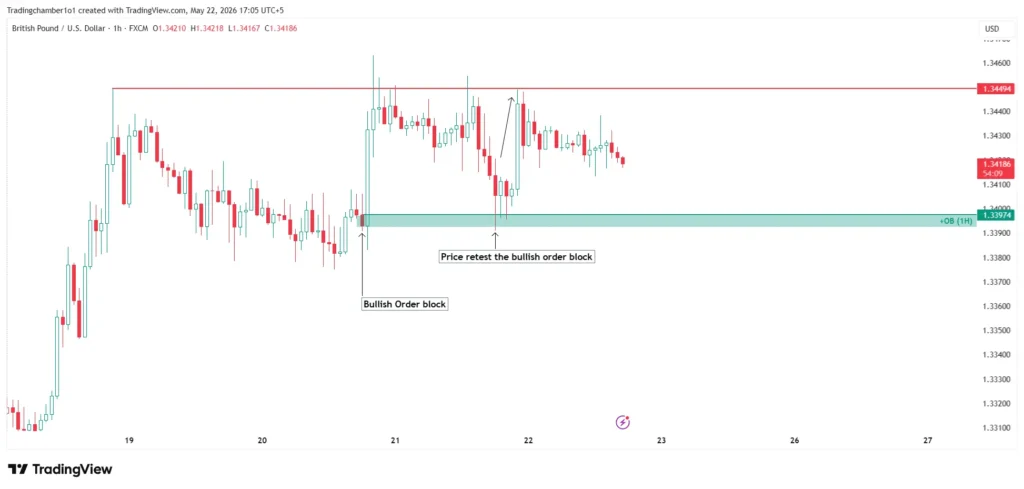
Live Order Block Trade Setups:
Conclusion — What You Now Know
Order block trading is not a shortcut. It’s a lens that helps you see where institutional money is positioned and trade in alignment with it.
Here’s what this guide covered:
- What order blocks are and why they form
- How to identify valid bullish and bearish OBs in three steps
- A complete entry, stop, and target framework
- The five most common mistakes traders make
- Tools to practice and execute the strategy
The next step is simple: open TradingView, pick one pair you trade regularly, and mark every order block from the last two weeks on the H4 chart. Then go back and see how many held. That exercise alone will change how you read price action.
Frequently Asked Questions (FAQ)
-
What is the difference between an order block and a supply and demand zone?
Both concepts identify areas where price is likely to react. Order blocks are more specific; they mark the exact candle before an institutional impulse, using smart money concept rules. Supply and demand zones are broader price areas drawn around consolidation ranges. Order blocks tend to give tighter, more precise entries.
-
Is the order block trading strategy profitable for beginners?
Yes, but only after proper backtesting. The strategy has a clear, rules-based structure that beginners can learn. However, new traders often skip the confirmation step and enter too early. Start on a demo account. Run at least 50 backtested trades before going live.
-
What is the best timeframe for trading order blocks?
Most experienced traders use H4 for bias, H1 for the order block zone, and M15 for entry confirmation. The multi-timeframe approach filters out noise and improves the quality of entries. Scalpers can adapt this to H1/M15/M5, but lower timeframes produce more false signals.
Ready to Go Deeper?
If this guide gave you clarity, you’ll love what we share in our weekly newsletter.
Every week we send:
- A real ICT trade breakdown (annotated chart included)
- One ICT concept explained in plain English
- Common mistakes we’re seeing traders make right now and how to avoid them
No spam. No fluff. Just practical ICT education for traders who are serious about improving.
[Subscribe to our free newsletter to get exciting information related to trading.]
You can unsubscribe anytime. But most subscribers tell us it’s the most useful forex email they get each week.
Risk Disclaimer: This article is for educational purposes only and does not constitute financial advice. Trading forex and other financial instruments involves significant risk. Always use proper risk management and consult a financial professional before making trading decisions.